keeping busy with our busy board!
Following on from the photo I shared of our play area a while ago, I’ve had a few messages about our Busy Board. I thought I’d share a bit more detail about it and how you can make your own.

Osk playing with the busy board
I can’t take too much credit for this one, as it was Grandad’s project for Osk - thank you Dad! Luckily it was finished just before Covid19 hit, so we have had it in our play area for a few weeks now. Osk still plays with it a few times each day and it seems to hold his attention longer than most toys/games, so it has been a great addition to our lives now that we are at home all the time.
What is a busy board?
A busy board is a vertical activity station with lots of everyday items to interact with. Ours has a light switch, bell, door with latches, a wheel, a ball drop etc.

Our busy board (with original bits & pieces - it’s evolved a bit since then!)
Our Busy Board
Our board has a few different elements:
Ball drop
This is by far Osk’s favourite part of the busy board. We have experimented with lots of different sized balls, but the favourite by far is the metal spring ball from Daddy’s protein shaker!
Light switches
One of these switches is just a switch that clicks, the other is a very bright battery operated LED light.
Sliding box
This is a wooden box with a sliding lid that we got some wooden magnets in. It just happens the be the perfect size for our flash cards, so I tend to pop different ones in when I remember.
Spinning wheel
This has not been so successful, I think because it is hard to see if it is actually spinning. At some stage I’ll paint it with coloured stripes so it’s fun to watch as it spins.

The ball drop, sliding box, spinning wheel and light switches.
Door stoppers
The twang of these little springs takes me back to playing with these as a kid at my granny’s house. He loves them just as much as I did.
Ring pull
My dad came up with this one, it’s just some rope with rings on the end to pull back and forth. It makes a jangley noise when the rings touch, so this is a big hit.

door stopper and ring pulls
Steering wheel
This is just a sanded down old offcut of wood with a knob attached to it. The weight of the knob naturally pulls it down, so no matter what way he turns it, it moves a little by itself. I started painting it green just to add a bit more colour to the board, but have never got around to the second layer.
Curtain Rail
This is a towel rail with some wooden curtain rings on it. I had great plans to hang some fabric from this like a curtain, but I have not had a chance yet. Any other suggestions for improvements welcome!
Chain & hooks
The red plastic chain is secured to one hook (left) and can be hooked and unhooked from the hook on the right.

mirror, steering wheel, chain & hooks - you can also see our Pikler triangle reflected here
!
Tap
The screw tap is pretty tricky to turn, so he is not that interested in it, but I’m confident he will be soon, as his two and a half year old cousin loves this feature.
Door with latches
A simple wooden door on hinges with two different latches to play with.
Bell
A metal bell hanging on a piece of ribbon - noisy!
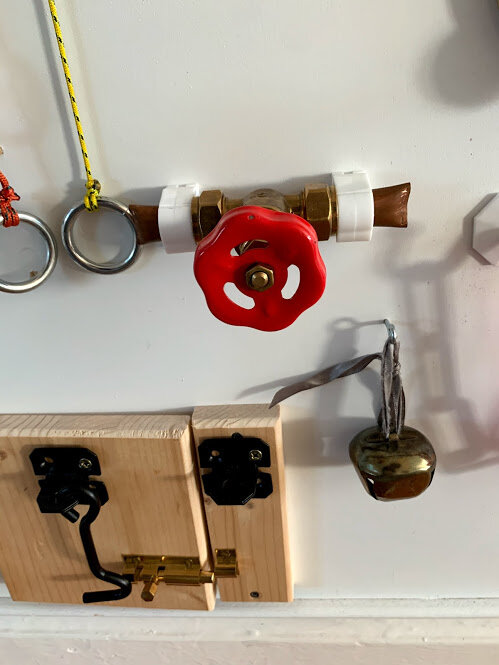
The screw tap, bell and door with latches
How to make a busy board
What you will need:
Large flat piece of wood (we repurposed an old jigsaw tray that we have had for years)
Really strong velcro
Screws
Glue
Screwdriver
Bits and bobs (light switches, bell, tap, chain, hooks, door stoppers, tubing, wheel etc.)
We used an old jigsaw tray that we haven’t used since having Osk, so we figured we would give that a new lease of life. Once we had all the gadgets, it was just a case of making them as safe as possible and attaching them to the board.

our jigsaw tray before it became a busy board (with GIANT hand shadow!)
How we made ours:
Step 1.
We gathered all the parts that we would need for the busy board. We spent a couple of weeks keeping an eye out and collecting bits and bobs to attach to the busy board. I visited my local hardware store and we rooted through the garage, our random stuff drawers and Grandad’s workshop.
Step 2.
We identified all the bits and bobs that we planned to attach to the busy board and laid them out roughly where we thought they might fit.

testing the layout of all the bits and pieces in the workshop
Step 3.
We made the pieces as safe as possible. For example, some of the lights have batteries, so we ensured the battery compartments were sealed shut. We also sanded and smoothed down any rough edges and removed any loose parts that we thought might pose a choking risk.
Note: as this is not a toy, we are not able to make it 100% safe. We supervise all play with the busy board.
Step 4.
We attached the pieces to the busy board using either screws, glue or strong velcro.
Tip: velcro is a good choice for safer items as it means you can update the busy board with different items to keep it fresh and interesting.
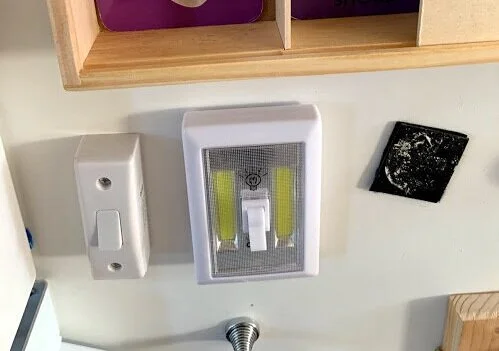
velcro (black square) visible on the right - this allows swapping items!
Step 5.
We waited for all the glue and velcro to cure so that the items were really stuck on well.
Step 6.
We tested the items to see if they could be pulled off, or if there were any sharp or loose parts that might pose a risk to Osk.
Step 7.
We chose a piece of wall (the old chimney breast) in our living room and attached the busy board to the wall using strong painting hooks.
Step 8.
The BIG REVEAL! Osk was totally disinterested with the busy board initially, but his cousin was over to play and she dove straight in. Since then it’s something that catches his interest for a few minutes here and there and that he keeps going back to.
Other busy board ideas
Outdoor Busy Board
As the weather is getting nicer every day now, consider making a weatherproof busy board on an external wall. Could you incorporate sand or water play?
Noisy Board
If you are low on gadgets and gizmos, consider making a noisy board. You could add a xylophone, wind-chimes, a bicycle bell etc. Apologies in advance!
Have a go!
Have a go at making your own busy board and share it with me on instagram, I’d love to see your ideas!
Disclaimer! Busy boards are not toys, and the bits that we attached to ours are definitely not all safe for toddlers. We supervise Osk 100% of the time when he is playing with the busy board.